Protect static files using JSON Web Token (JWT) authentication
Sirv lets you create expiring URLs that protect your files from being downloaded or requested with different properties or simply from being viewed after a period of time. Known either as JSON web tokens (JWT) or signed URLs, it gives you tight control over who can access your images, for how long and with what image processing options.
What are JSON Web Tokens?
JSON Web Tokens are an open, industry standard RFC 7519 method for representing claims securely between two parties. The recipient of the token cannot modify the URL to request a different image (unless you allow that), so this is a very effective way of serving dynamic images without allowing the recipient to remove a watermark or modify an image in any other way.
JWTs can protect any file in your Sirv account, not only images.
How it works
Your application would use a secret key to generate a JWT locally, which is then immediately ready to use on one or more of your files. When Sirv receives a request for a file with that token, the first thing the server does is to validate the signature within the JWT. If it is invalid, it won't proceed and will return a 403 forbidden error.
Generate a JWT Web Token URL
1. Ask the Sirv support team to enable JWT tokens for your account.
2. The Sirv team will provide you with a JWT key so you can generate tokens.
3. Connect to the Sirv REST API.
4. Use the JWT POST method to create a JWT secure file URL.
Protect files or folders
You can generate tokens to view a specific file or all files in a folder (and its sub-folders). Specify the filename (audience) with any of these possible values:
- / can be used on any file in your account.
- /path/t can be used on any file in folders starting with the letter t in the path folder e.g. /path/to/, /path/t1/, /path/t2222/ etc.
- /path/to/ can be used on any file in the /path/to/ folder.
- /path/to/file.jpg can be used on that specific file only.
Such granular control means that you can use JWT to protect 360 spins (.spin files) as well as any other file in your Sirv account.
Example URLs
Below are examples of JWT protected image URLs. The encoded token contains a text overlay "Hello!", which cannot be removed. The URL also includes 800px width outside the token, which can be modified.
Click the links to test the URLs:
- Image with token expiry 21:11:24UTC, 7 January 2022 - this image will be denied, as the token has expired:
https://demo-jwt.sirv.com/aurora.jpg?w=800&jwt=eyJhbGciOiJIUzI1NiIsInR5cCI6IkpXVCJ9.eyJhcmdzIjp7InRleHQiOiJIZWxsbyEiLCJ0ZXh0LmNvbG9yIjoid2hpdGUifSwiaWF0IjoxNjQxNTg5ODU0LCJleHAiOjE2NDE1ODk4ODQsImF1ZCI6Ii8ifQ.-3KmvR3x5Gc9JoiOGLBSmWzUK5OkzPI3w-SM9ZJXBIM - Image with token expiry 07:54:13UTC, 10 January 2051 - this image will be served:
https://demo-jwt.sirv.com/aurora.jpg?w=800&jwt=eyJhbGciOiJIUzI1NiIsInR5cCI6IkpXVCJ9.eyJhcmdzIjp7InRleHQiOiJIZWxsbyEiLCJ0ZXh0LmNvbG9yIjoid2hpdGUifSwiaWF0IjoxNjQxNTkwMDUzLCJleHAiOjI1NTY5NTAwNTMsImF1ZCI6Ii8ifQ.8CFLrjMhj8o_m1NJOKKsgLy8elxnqJ7BPcGDnQWPqHo - Image with token expiry of 08:00:46UTC, 10 January 2051 and fixed width of 500px (hidden) - this image will be served:
https://demo-jwt.sirv.com/aurora.jpg?jwt=eyJhbGciOiJIUzI1NiIsInR5cCI6IkpXVCJ9.eyJhcmdzIjp7InRleHQiOiJIZWxsbyEiLCJ0ZXh0LmNvbG9yIjoid2hpdGUiLCJ3Ijo1MDB9LCJpYXQiOjE2NDE1OTA0NDYsImV4cCI6MjU1Njk1MDQ0NiwiYXVkIjoiLyJ9.4qay2gHtp4zqs5leL0orRCIiW-iCF6Mkhs-NPYFWZUo - Image without token - this image will be denied:
https://demo-jwt.sirv.com/aurora.jpg
You can check the contents of a JWT token by pasting it into a JWT validator. It will show you the header, payload and signature. Try pasting this token:
eyJhbGciOiJIUzI1NiIsInR5cCI6IkpXVCJ9.eyJhcmdzIjp7InByb2ZpbGUiOiJFeGFtcGxlLVRleHQifSwiaWF0IjoxNTcyNjk4NzQyLCJleHAiOjE1NzI3ODUxNDIsImF1ZCI6Ii9EU0NfNTExOC5KUEcifQ.WOi5Pqi4KRfAqBPzpHU3QXMfnnxDMhnwXTrSZ2RmkwQ
The 256-bit secret within the token is base64 encoded.
Token options
The token can contain many kinds of restrictions:
- Expiration - set an expiresIn time in seconds, after which the image will no longer load. This is a required field.
- Filename mask - set the filename to determine which file/files/folders the token can be used on. This is a required field.
- Profile/Parameters - set the secureParamsapply to apply a Sirv profile and/or any of Sirv's dynamic imaging options to the image/spin. This is an optional field.
Most of Sirv's dynamic imaging options can be added to the URL, except text and watermark options. Those are ignored, to prevent watermarks/text overlays from being removed.
It's usually desireable to permit images to be fetched at different sizes and qualities, so that Sirv responsive imaging can serve dimension/quality images to different screens/browsers. If you'd like to restrict resizing or any other options, so the user can't modify the image, include those options as secure parameters when you generate the token.
You may prefer to apply the parameters via a profile instead of individual parameters. Profiles can be created and updated from the profiles page of your Sirv account. This will let you change the appearance of an image in the future, without changing the URL or regenerating JWT tokens.
Consider using a JWT library
To speed up your implementation of JWT protection, consider choosing from this list of JWT libraries for common programming languages.
When submitting requests:
- Expiration is required
- Algorithm must be HS256
- Audience must have a filename prefix
Example request
Instead of using a JWT library, you can write your own scripts to generate JWTs.
A Node.js example script for generating a JWT token is provided in our Node.js REST API documentation.
A JavaScript example script for generating a JWT token is provided below.
'use strict';

const { URLSearchParams } = require('url');
const jwt = require('jsonwebtoken');

const filename = '/example-image.jpg';

const params = new URLSearchParams({ // put insecure parameters here
  w: '10%',
  h: '25%'
});

const data = {
  args: { // put secure parameters here
    text: 'Hello'
  }
};

const key = 'topsecret';

// generate token
const token = jwt.sign(data, key, {
  algorithm: 'HS256',
  expiresIn: 300, // seconds
  audience: filename
});

params.append('jwt', token);

console.log('https://example-account.sirv.com' + filename + '?' + params.toString());
Create JWT URL with Postman
A quick way to create and test JWT URLs is with Postman.
1. Ask the Sirv team to generate a JWT key for you, protecting a folder in your account.
2. Follow the steps to install Postman and the Sirv Postman collection.
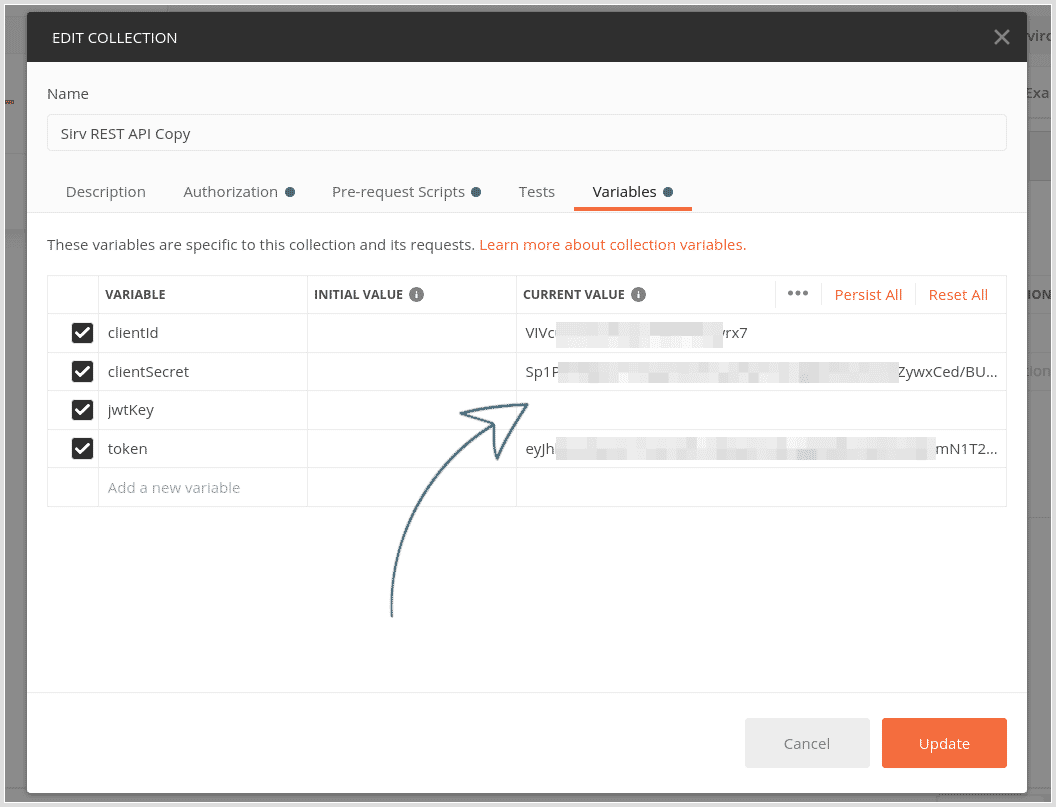
3. Enter your JWT key into the collection variables.
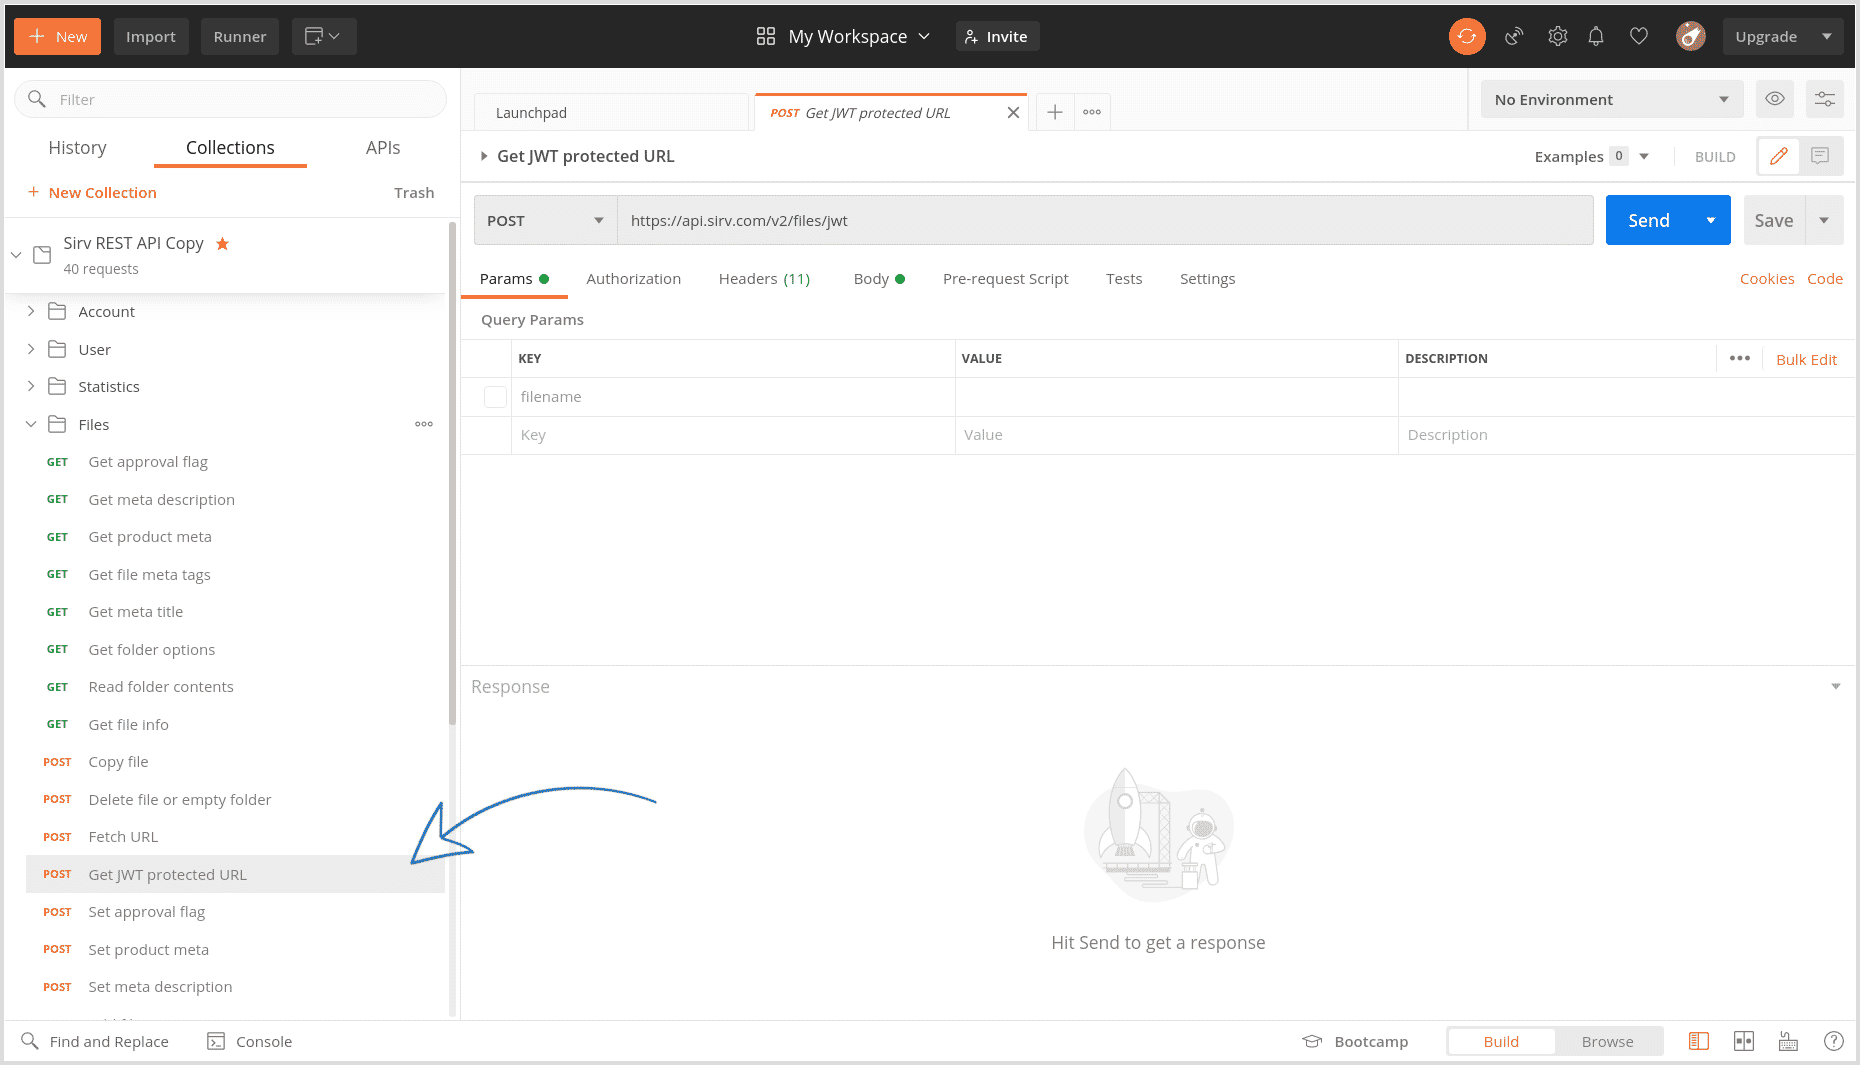
4. Click the "Get JWT protected URL" request on the left (under Files).
5. In the Body tab, enter the path and filename of the image you want to generate a JWT URL for. Enter the number of seconds it should stay alive for. Enter the options you'd like to apply - any of Sirv's 130 dynamic imaging options can be applied.
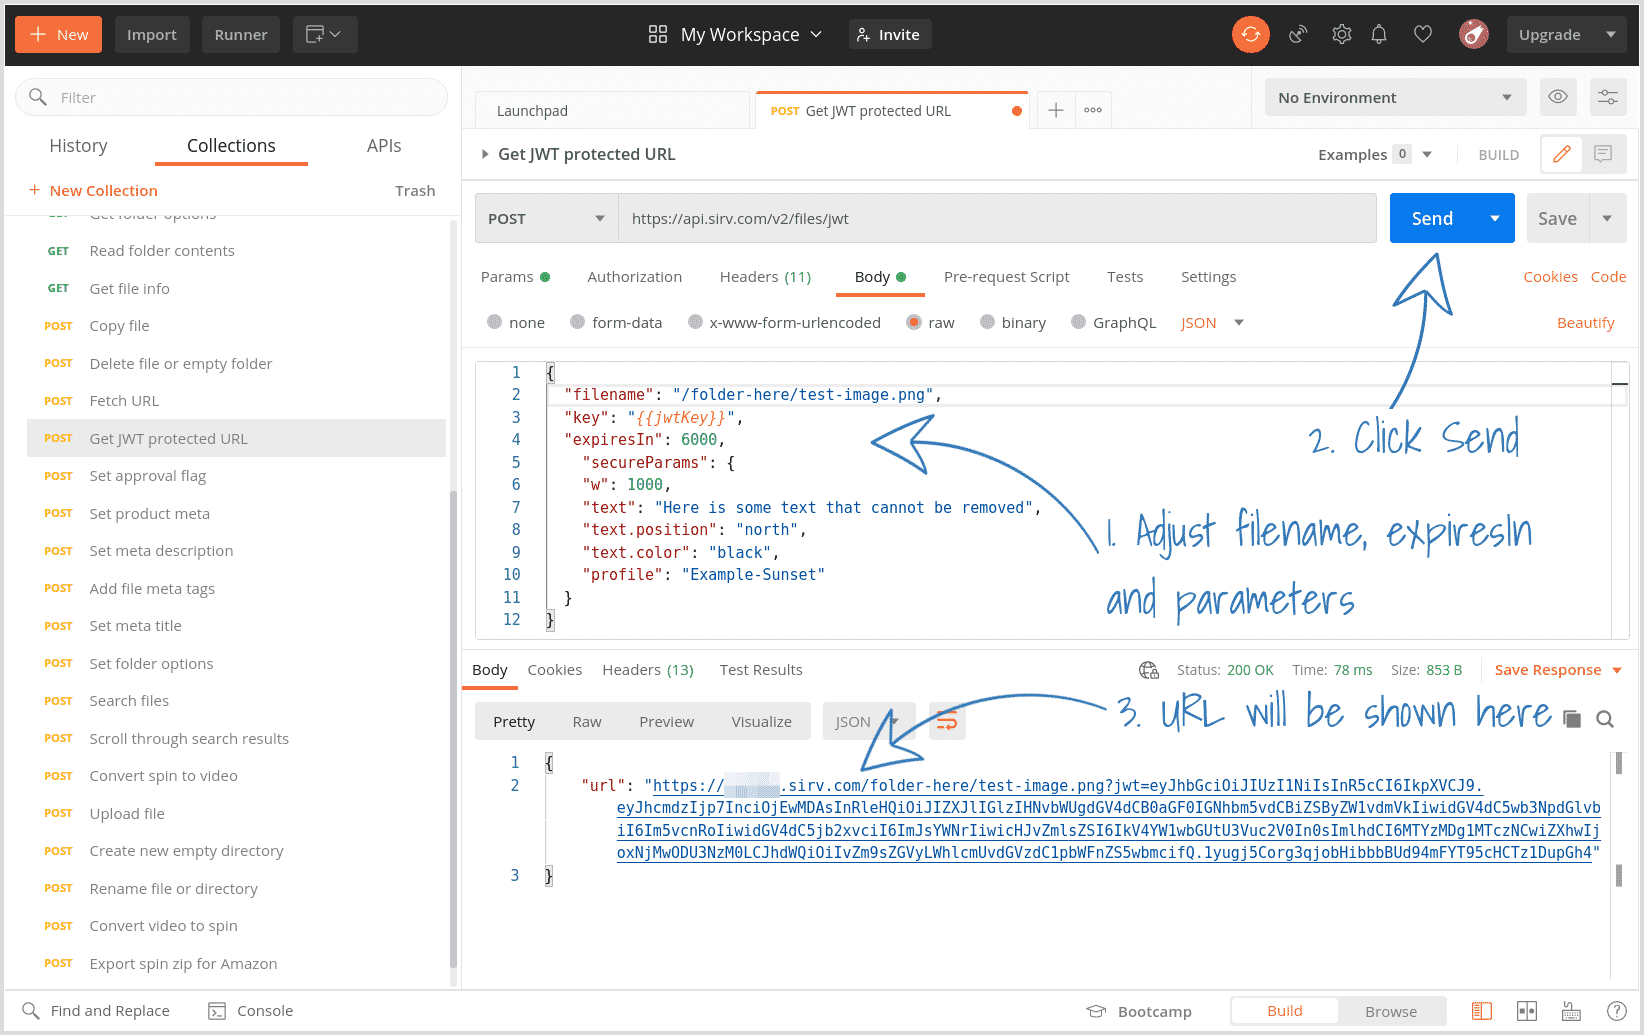
6. Click "Send" and the URL will be generated.
Troubleshooting
If a JWT protected URL returns an error, you can investigate why:
- 400 - JWT verification succeeded but paramater is not valid. The browser will output a summary of which parameters failed, to help you identify the issue(s).
- 404 - JWT verification succeeded but file does not exist at that location.
- 403 - JWT verification failed due to wrong signature; wrong key used to create token; expired link or another problem with server verification of the JWT itself. See below to troubleshoot.
If you received a 403 error, use your browser console to narrow down the cause. Find the x-sirv-auth-result reponse header, which will contain a value such as 'expired key', 'signature mismatch' or 'invalid payload'.

Support
Please send any questions about usage of Sirv JWT tokens to the Sirv support team.